Tracking Tiger: Follow hole-by-hole look at Woods' Friday round
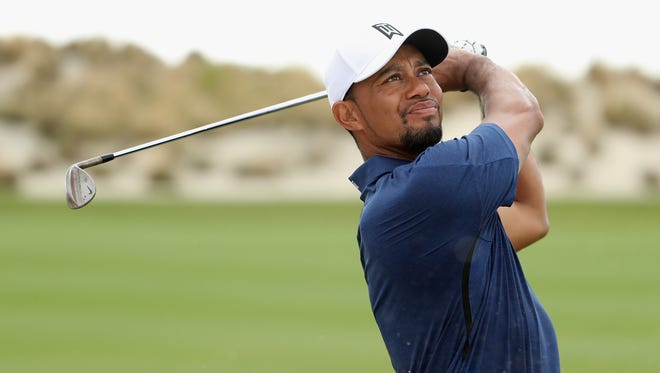
NASSAU, Bahamas – As he walked to the fifth tee Friday in the second round of the Hero World Challenge at Albany Golf Club, Tiger Woods turned to his caddie, Joey LaCava, and said, “Let’s keep the card clean,” of bogeys.
Through nine holes he did just that.
By himself.
Tiger Woods is up and down in return to competition
Woods played solo when Justin Rose withdrew from the tournament with a balky back. This allowed Woods to set his own pace. He played the front nine in less than 90 minutes.
And he played well. With a solid par save on the fourth, the result of a good chip, and a stunning par save on the eighth from the waste area, the result of a blast from the sand over high grass, Woods kept bogeys off the card.
He also wrote down three birdies – a flip wedge on the first to four feet, an 18-footer on the sixth that he said the line was “just down Broadway,” and a wedge to two feet on the ninth.
For the second consecutive day, Woods made the turn in 3-under 33. Following his 73 in the first round, he stood at 2 under through 27 holes. At the time he was 6 shots out of the lead.
There were no issues with his troublesome back. No issues once again with his chipping game. No issues with his length – his power is back. Swinging freely and with a bounce in his step, Woods’ comeback after 15 months continued to look impressive.
Follow along as we track Tiger's second round, hole-by-hole.
Front nine
Hole 1: Par 4
- Birdie - Known for struggling off the tee early, Woods pured a drive and stuck his second shot just feet from the hole for a birdie to get to even for the tournament.
Hole 2: Par 3
- Par - Tee shot skates onto the green but the birdie putt is missed. Woods taps in for par.
Hole 3: Par 5
- Par - As we've grown accustomed to seeing, Woods' struggled to find the fairway, even with his second shot lay-up after his tee shot pulled to the left. He scrambled to save par to remain even (one-under on the round).
Hole 4: Par 4
- Par - Woods' drive ends up in the rough in the middle of the fairway. After a great chip gets close to the cup, he was able to get away with par to remain even (one-under on the round).
Hole 5: Par 3
- Par - Woods tee shot landed safely on the green for a birdie chance that slid past the hole. He tapped in for par to remain even (one-under on the round).
Hole 6: Par 5
- Birdie - The club twirl on the tee box was almost as good as Woods' drive, which landed in the middle of the fairway. The drive was wasted by a poor second shot to the bunker, but Woods was able to get up-and-down for another birdie to drop to one-under par for the tournament (two-under on the round).
Hole 7: Par 4
- Par - An iron into the waste area leaves Woods' scrambling to save par to remain one-under for the tournament (two-under on the round).
Hole 8: Par 3
- Par - Another bad iron off the tee lands in the waste area, but Woods hit a beautiful pitch for a chance to get up-and-down and remain one-under for the tournament (two-under on the round).
Hole 9: Par 5
- Birdie - Woods cruised down the fairway with a wood off the tee and iron from the fairway, setting up for a chance at birdie after a great approach shot. He tapped in to finish the front with a three-under 33, moving to two-under for the tournament.
Back nine
Hole 10: Par 4
- Par - A beautiful drive and useful approach set up a birdie chance that lipped out, leaving Woods with par to remain at two-under for the tournament (three-under on the round).
Hole 11: Par 5
- Birdie - Another great drive off the tee and second shot leads to an eagle putt from just off the green and ran short. Woods immediately stood over the putt to tap in for birdie, moving to three-under for the tournament (four-under on the round).
Hole 12: Par 3
- Birdie - Cruising early on the back nine, a pin-seeking tee shot rolls right next to the cup for another tap-in birdie, moving Woods to four-under for the tournament (five-under on the round).
Hole 13: Par 4
- Par - Another booming drive leaves Woods a birdie putt that refused to break. A tap-par keeps Woods at four-under for the tournament (five-under on the round).
Hole 14: Par 4
- Birdie - Woods smoked his drive to the right of the green, settling up next to the whole with a chip shot. Another birdie brings Woods to five-under for the tournament (six-under on the round).
Hole 15: Par 5
- Birdie - Woods' driver stayed hot after his tee shot ran down the right side of the fairway. His second shot landed on the green for a long shot at eagle that missed. The birdie tap-in moves Woods to six-under for the tournament (seven-under on the round).
Hole 16: Par 4
- Par - A wayward drive into the dunes left Woods a difficult second shot that didn't make the fairway. He was able to get up-and-down from distance to avoid bogey and remain six-under for the tournament (seven-under on the round).
Hole 17: Par 3
- Par - Woods keeps swinging hot irons as his tee shot lands safely on the green for a long chance at birdie. The putt slid by the hole, leaving him a tap-in for par to remain at six under for the tournament (seven-under on the round).
Hole 18: Par 4
- Par - Another great drive left Woods in the fairway, followed by an approach that just missed the green. Woods would two-put for par to shoot a seven-under 65.
